Asynchronous JavaScript using Callbacks

I recently struggled when faced with a problem of using callbacks to handle the asynchronous flow of multiple API calls.

So I figured I’d do a deep dive into callbacks to refresh and solidify my knowledge.  After all, if you want to truly understand something, teach it to someone else!

Functions as First Class Objects

Before we start talking about callbacks, we must first know that JavaScript functions are first-class objects.

Which means what?  And why is that important to a discussion about callbacks?

Being a first-class object in JavaScript means that functions can have properties and methods just like any other object.  Consider this:

It also means that functions can be assigned to a variable.

More importantly for our discussion on callbacks, however, is that because functions are first-class objects, they can be passed to (and returned from) other functions.

This last point, passing functions as arguments to other functions, is the foundation of callbacks.

A callback is simply a function that is passed to another function as an argument, that can then be used (executed) inside that other function.

The previous example used a named function (answer) as the callback. You can (and probably have) also use anonymous functions as callbacks.  This is common when passing callbacks to the native prototype methods for arrays, objects and strings.

Consider the following:

Here we used an anonymous arrow function as our callback to output twice the value of each element.

Now that we know what callbacks are, let’s talk about their use in asynchronous JavaScript.

Understanding ASYNCHRONY

Image of the Police Album - Synchronicity

No, this isn’t what we’re talking about, but the word ‘asynchony’ makes me think of this album…..  Yeah, I know, I’m old…

Before we start talking about controlling asynchronous flow we must first understand the nature of the JavaScript event loop and the fact that it is single threaded. Digging deep into the JavaScript engine is beyond the scope of this post, but understanding the single threaded nature of the event loop is critical to understanding why we need asynchronous code.

For now, think of the event loop as a queue (first in, first out) that executes snippets of your JS code one by one and in the order they were placed in the queue.

Now think of an Ajax request that we might use to get some data from an API.  That Ajax request is costly (in time).  If we place it in the event loop and run it synchronously it will block everything that comes after it while it waits for a response. This affects performance and causes people to leave your site!

In his You Don’t Know JS series, Kyle Simpson describes asynchrony as the difference between now and later, as opposed to parallel, which describes two processes that are executed independent of each other (but possibly at the same time).

This now and later concept is where callback functions come in.  Rather than running that Ajax request from start to finish, blocking all other code execution while we wait, we pass it a callback.

In this scenario, the JS engine can make the Ajax call (now), continue with the event loop, and once the Ajax call returns (later) pass the callback, along with any data it needs from the response, back into the event loop.

Async in action

Let use an example to show what we’re talking about.  For the remaining examples, I’m going to use setTimeout() to simulate async functions, but you can think of it as time spent making an Ajax request.

This example shows asynchronous control of the event loop. Let’s dig deeper in case this isn’t clear.

We’ve defined three functions first, second and delay.

first and second merely log “first” and “second” to the console so we can tell when they’re executed.

delay takes a callback, which it passes to setTimeout(). setTimeout() sets a timer, then calls the function it was passed – in this case, it will call callback after 500 milliseconds.

After the three function definitions, we call delay(first), which puts the function delay() in our event loop.  Upon execution, delay sets a timer for 500 ms, after which, it will call its callback (in this case first()).

Because the timer in setTimeout() is non-blocking, or asynchronous, the event loop is now free to move on to the next snippet of JS, which is our function call to second().

When second is executed, it logs “second” to the console, which is why we see “second” logged to the console before we see “first”, even though delay(first) was called before second().

And finally, after the 500 ms timer elapses, first() is placed in our event loop and executed, which is when “first” shows up in our console.

I’m hoping the example above was simple enough that you could figure it out on your own, otherwise, maybe my long winded explanation helped.

Fun with callbacks and closure

OK, now that we’re pros with callbacks, lets have a little fun with them!

We’re going to use callbacks and closure to set up a four lane race. Granted, it’s only a race in the sense that we’re randomizing the setTimout() time, but it’s fun nonetheless…

Hopefully, the comments in the code clear up how the “race” is being run. If you have any questions, feel free to leave them below.

-Jeremy


Developing a Team Project vs. Flying Solo

This week I embark on my second remote team project as part of the Chingu Cohorts. In doing so, I’d like to take a minute to reflect on what I learned in my first ‘Voyage’ cohort.

Photo by Andrew Neel on Unsplash

Working as part of a team is not something new to me. I’ve spent the past 20 years doing research in the pharmaceutical industry, all of which were spent on teams of various sizes and levels of interaction. This was, however, my first experience as a part of a development team and it provided some new challenges versus developing a project on my own.

My group was comprised of three people, all of whom had experience developing full stack applications and two of whom (not me) had experience with previous group projects through Chingu.

Of course, heading into the project, I had the usual apprehensions and nervousness about coding as part of a group, like “What if my code isn’t up to par with the others in the group?” and “What if I make a mistake and completely destroy the group’s code base?” and so on…

As usual, these kinds of apprehensions worked themselves out as we began to dig into the project and I’d like to think that I walked away a much better developer for having been part of it. I learned a lot from the other two members of the team, and I’d like to think that they were able to learn something from me in return.

As I reflect on the experience as a whole, I find there were two key elements that greatly impacted the progress and overall success of the team project that don’t come into play in individual projects, communication and workflow. As you’ll see below, these elements are very much intertwined, but I’ll address each of them individually.

Communication

When you’re working on a project by yourself you have a complete picture of the scope and state of your project at all times. If you don’t, it’s pretty safe to say your project is going to have some serious issues…

As part of a group project, however, you are dependent on your teammates to provide you with any and all changes they’ve made (and they are dependent on you for the same).

Photo by James Sutton on Unsplash

These communications can come in different forms, and we’ll get into some of them below in the workflow section, but suffice to say that if you’ve made a change to the project and have not communicated it in some way to your teammates, they are not aware of it!

Which means they will continue with their own tasks as if your change has not happened. This can lead to unnecessary headaches and many wasted hours down the road… All of which could have been prevented through good communication among the team members.

On the surface, this may sound like an obvious concept and not exactly worth writing (or reading) an entire article about. But if you are used to working alone, with all the communication happening unconsciously in your own head, this represents a critically important change in your normal process.

As such, make sure you act like a good teammate and keep everyone in the loop. This doesn’t have to be difficult or time consuming. Chances are your team has established lines of communication. Keeping everyone in the loop can be as simple as updating the status on a Trello card or dropping a quick line in a slack channel.

When in doubt, err on the side of more communication.

Meaning, if you’re not sure if something is relevant to the team, just throw a quick FYI out there to whatever channel the team is using and move on.

I doubt there are many former teams out there saying “I couldn’t do my work, there was just too much communication going on!” but there are plenty out there saying “Our team fell apart because nobody communicated…”.

Workflow

Which brings us to workflow.

By workflow, I mean how your team manages the git process and if they are effectively using branches, commits, pull requests, etc.

As I said before, this was my first group development project. I had used git previously for my solo projects but I had a lot to learn when it came to using git as part of a team.

Fortunately, Francesco Agnoletto has written a series of guides that clearly outline how git should be used in a team setting. I highly recommend reading (and bookmarking for future reference) all three articles. They can be found here — part 1part 2 and part 3.

Personally, I’ve read them each several times and our group used them as the rule for how our team would handle workflow.

I’m not going to restate what Francesco has written in his articles, as I think he covers the material very clearly, but I do want to highlight several points that he makes as it relates to this article.

First, when done effectively, good workflow enhances team communication. As I stated earlier, communication and workflow are very much intertwined, and each can enhance the other.

Photo by Pavan Trikutam on Unsplash

Choosing (and sticking to) a good naming convention for branches will clearly let your teammates know exactly what you are working on. This, paired with clear and simple titles for your commits, not only provide the intended version control, but also a map of what each team member is (and was) working on.

The aforementioned guides have advice on naming conventions for both branches and commits. Read them!

Now that we’ve all read Francesco’s articles and are all on the same page as far as workflow is concerned, there’s one last point I’d like to make. Be very diligent about not making changes that are outside the scope of your branch.

This is very important and can not be understated! When working as part of a team, do not make changes that are not in the scope of the branch on which you are working!

In the spirit of honesty, this is something that I have a bad habit of doing when I’m working on solo projects. If I’m working on one feature and remember something that I meant to change in a different part of the code base, I just go and change it without worrying about what branch I’m on.

While this might be bad practice, it probably won’t get you into too much trouble when working alone. Doing this as part of a team project on the other hand, can have very bad consequences.

Making a change to code that one of your teammates is actively working on (in addition to pissing them off) has the potential to cause all kinds of conflicts when they try to merge their changes. They might spend just as much time resolving merge conflicts as they did making changes to the branch in the first place.

Not good for team dynamics…

Summary

If you plan on making a career out of software development, you’re going to have to learn to work as part of a team. This is definitely one of those soft skills that can greatly enhance (or hinder) your effectiveness as a developer.

It doesn’t have to be difficult though, it just takes some conscious effort. Stay mindful that you are part of a team and act as such. Strong communication and workflow will make your team greater than the sum of it’s parts, but the opposite will absolutely drag your team’s progress to a halt.

And if you’re working to become a developer, do yourself a favor and look into the Chingu Cohorts. It’s an awesome global community of developers and aspiring developers working together to do great things.

-Jeremy

Chingu Speedrun Challenge: Weather and Wiki

Projects 3 and 4 of my Speedrun challenge are now functional. You can find the code to the four front end projects I’ve completed so far in this GitHub repo.

As I’ve stated before, for the sake of time I’m holding off on styling the apps until the end, so these Local Weather and Wikipedia Viewer apps are pretty ugly. They do, however, function properly, which is all I’m looking for right now.

What I learned

The Weather and Wikipedia projects provided more repetition in making HTTP calls using Angular. Both projects require the use of an API call in which fairly large JSON objects are returned. Working through the two projects helped solidify my ability in handling such calls and rendering the relevant results.

Biggest Challenge

I think the biggest obstacle I had to face with these two projects (other than putting together an API link to Wiki that actually worked) was rendering the results of the Wiki API.

For each query to the Wiki page, you’ll receive an object that contains (potentially) multiple responses that you need to render in the HTML page. In Angular, this immediately makes you think of the *ngFor directive, but that will only work for objects that are iterable.

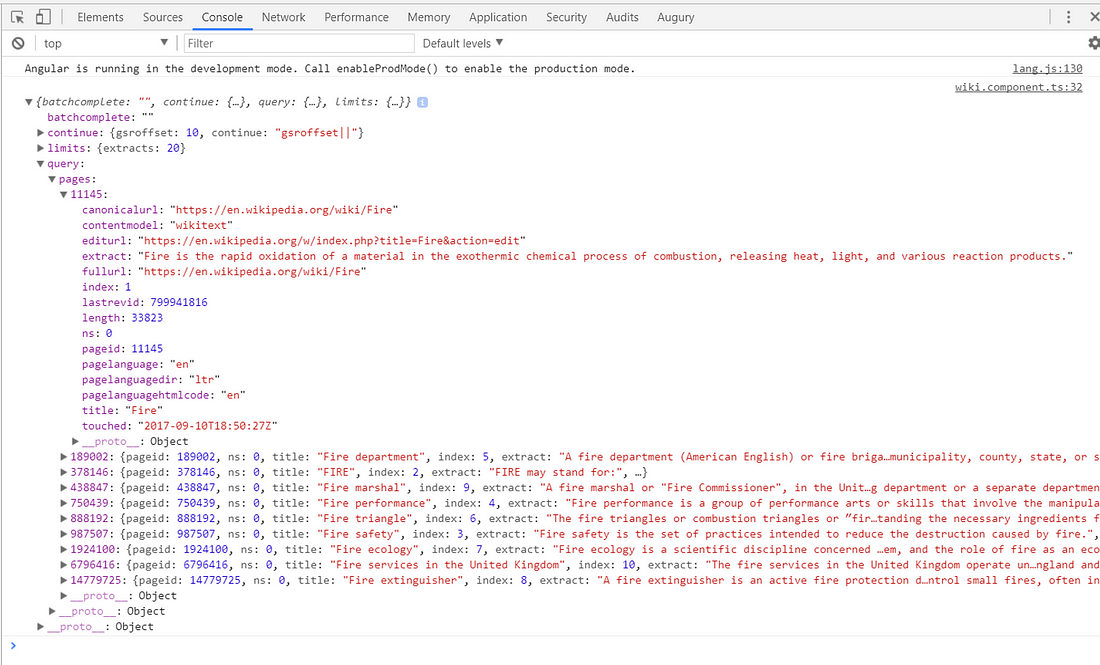
If I query the Wiki Viewer for the word “fire”, the following object is returned:

You can see that Response.query.pages contains 10 objects that we need access to in our HTML. As this object is not iterable and at the moment (as far as I know) Angular does not provide an option for iterating over objects, we need to figure out a way to iterate over the object.

It’s possible to reformat the results into an array, but it would be easier to use a pipe (see this stackoverflow answer).

The following function will return an array of keys to the object ‘this.results’.

You can see when we set

 and we run it with the same example as above, ‘fire’, we get an array of keys to the pages object:

We can now use the keys() function to iterate over the object we want to access in our HTML using *ngFor

That’s it! I’m on to my next project….

-Jeremy

Chingu Speedrun Challenge: Quotes and Rabbit Holes

This is an update to my Chingu Speedrun Challenge. If you don’t know what the hell I’m talking about, it’s explained here.

The Speedrun Challenge is all about repetition and iteration so that something new becomes second nature. This post covers the second project, the Quotes app, which should be the first of several projects that will focus on making and handling API calls in Angular.

I’m off to a slower start than expected in my Speedrun for two reasons. Actually three reasons, but I don’t plan on ‘fixing’ time spent taking my kids to baseball and football, I’ll just have to work around that…

The two causes for the slow start that I can address are A) being overly nit picky about the design of each project (Tribute Page) and B) diving down deep rabbit holes (Quote Project).

Hold off on Design until the End

The first issue (design) I plan on addressing by not styling any of my projects until the end. I’ll focus instead on getting as many functional apps built as possible. At the end, I will style the collection of apps as a whole as much as possible before addressing them individually.

Each project will have a minimum level of styling that is essential to the functionality of the app. I will attempt to keep the styling to the level of functionality and not get stuck in the weeds on the little things.

Avoid Rabbit Holes

The second issue (rabbit holes) will be harder to fix.

While I was building out the Quotes App, I got stuck focusing on how to cast an observable to a custom type. I had a working API call fairly quickly, using the https://talaikis.com/api/quotes API (this API returns 100 quotes so I could limit the HTTP calls).

It’s my nature, however, to dig deeper when I don’t fully understand something. Here, I was having a hard time understanding the best practice in Angular for taking the Observable that is returned from the HTTP call and converting it to a custom type.

This led me down a rabbit hole looking into observables, classes, interfaces, reading more on Typescript, etc, etc.. While this was definitely helpful, and I learned quite a bit, I have to keep in mind that the Speedrun is mostly about tackling as many projects as possible.

Moving forward, I’ll try to make a conscious effort to limit my research to gaining a working knowledge of a topic, then move on. This will be difficult, as I have a habit of digging deep into topics that I don’t completely understand. For these instances, I’ll keep a list of topics to research further after the Speedrun ends.

You can find the code for the Quotes App here. I’ll be working on the Local Weather App next.

Chingu Speedrun Challenge: Project Started and Tribute Page Built

Earlier this year I was fortunate enough to discover, and become part of, the Chingu Cohorts.

Here’s a medium article on what the Chingu Cohorts are, but suffice to say that it’s an online (Slack) community of individuals determined to be the best developers they can be and help each other along the way. It’s a place for learning, building, collaborating and motivating, and I feel lucky to have found it.


Recently, a group of Chingus started a Speedrun Challenge, which is basically up to a month spent building as many of the Free Code Camp (FCC) projects as possible to learn and master a particular stack. You can learn more about the Speedrun Challenge in this Medium article and this GitHub repo.

I’m starting a Speedrun today and will be working with the MEAN stack. Part of the Speedrun Challenge is to write a blog or Medium post for each project completed. This is my post for the Tribute Page.

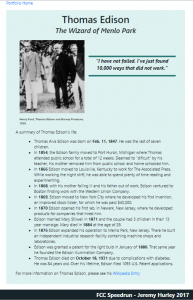
Given that the Tribute Page is the first ‘Basic Development Project’ in FCC, it’ll be a very basic project consisting of one static page paying tribute to someone or something. To speed things up, I’ll be reusing the content from my original tribute to Thomas Edison.

Project Structure

The final part of the Challenge is to create one single page application (SPA) out of all the projects that you’ve created. With this in mind, I’ll be building all the individual FCC projects as one larger application with a single landing page.

I created the project using the Angular CLI by running the following code in the VS Code terminal (View->Integrated Terminal):

This sets up a project called “fcc-portfolio” in the current terminal directory. The various flags do the following:

  • --prefix fp  will prefix all the the component selectors with “fp” (default: app)
  • --routing  will generate a routing module (default: false)
  • --style=scss  will set the style file extensions to scss (default: css)
  • --source-dir=client  will name the source directory ‘client’ (default: src)

Big thanks to P1xt for pointing out the bottom 3 flags listed above. They definitely saved me some time setting up routing and Sass.

Once the project was up and going, it was quite easy to add the Tribute page using my previous project as a guide for content.


Currently, I have the app.component acting mostly as the <router-outlet> with the router serving up the LandingComponent and the TributeComponent as called for.

The LandingComponent will continue to act as the main landing page with links to all the various projects.

You can follow my code in this GitHub repo.

Biggest Challenge

For me, the biggest challenge here was design and making the page responsive. Maybe challenge is the wrong word… It’s certainly where I spent most of my time.

I’m fairly new to working with CSS Grid and Sass, so incorporating those and making the page fully responsive took more time than it should have. But hey, isn’t that why I’m doing this??

You can see the final product above. I’ve decided to call this good enough for the time being (with respect to design) and move on. I’ll come back in the end and work on getting the design to look consistent throughout all projects.

Alright, off to my next project.

-Jeremy

Active vs Passive Learning – What’s the best way to learn to code?

So, you’re learning to code… When you sit down at the computer, do you open an online course? A book? An IDE and start hacking away?

Photo by Alejandro Escamilla on Unsplash

After all, what is the most effective and efficient way to learn to code?

We live in exciting times and the ability to code can open a lot of doors. Never before have this many top notch resources been so readily accessible to anyone willing to roll up their sleeves and dig in.

So, what is the best way to learn to code?

Learning to Code Strategies

The way I see it, there are two main strategies for learning to code.

The first, passive learning, involves the consumption of resources. By this I mean reading books, websites, and other blogs, or watching tutorials on Udemy, Coursera and YouTube.

The second, active learning, involves lots of practice.  This can include building side projects, working through the freeCodeCamp curriculum or writing solutions to algorithm challenges at sites like CodeWars or HackerRank.

But which is better, active or passive?

The answer, in my opinion, lies somewhere at the intersection of the two.

I know, way to take a stance, right? Let me explain…

Photo by Syd Wachs on Unsplash
When to Make the Leap

I’ve given this question a lot of thought lately with how it relates to my own situation…

I’ve been learning Angular over the last several months while working my way through the Free Code Camp data visualization and back end sections.

I started with Angular by doing some reading, then enrolled in this Udemy course. Max is an excellent teacher by the way, and I highly recommend his courses.

The problem is that there are almost 400 lectures and over 26 hours of content! Considering that I coded alongside the examples and took copious notes (not to mention my full time job and two kids!), this course would take me forever to get through.

After spending a few weeks working my way through most of the course and it’s examples, I started wondering — “do I know enough to try to build something??” It turns out, no, I really didn’t…

It wasn’t that I didn’t know Angular in enough depth. You don’t necessarily need to know something in great depth to get started, that’s where the iteration between active and passive comes in.

The problem was that I didn’t have the breadth of knowledge to start on my own. I had a hard time moving from the active phase to the passive phase because I didn’t know what I was looking for.

This led me to come up with the following guideline to use in the future

“Try to learn what you don’t know before you starting on your own…”

Photo by William Iven on Unsplash

I know, sounds pretty asinine right? Let me try to explain with an example…

How can you possibly “learn what you don’t know”?

Let’s return to the Udemy course example.

I had worked my way through the components, data binding, directives, services and forms modules of Max’s course. Of course, I didn’t know everything about implementing them off the top of my head, but at least I had a general idea about how they each worked.

Photo by Tim Umphreys on Unsplash

In other words, I knew that these parts of Angular existed and generally what they were responsible for. That way, when I encountered a problem, I knew where to start digging for a solution.

For these topics, I knew what I didn’t know.

I had not, on the other hand, looked at the HTTP section of the course. So when I had to make an API call in my Angular app, I didn’t know there was a mechanism in Angular to handle this.

So I turned to something I already knew… I tried setting up a jQuery.ajax() call, not knowing that Angular had their own HTTP service.

Had I at least glanced through the HTTP module, I would have learned enough to know it existed, and therefore would have turned to the proper solution make my API call.

The Take-Home Lesson

My point here isn’t that I’m an idiot for trying to set up $.ajax() in an Angular app. Although if the shoe fits, right??

My point is that I would have been better off if I had gotten a broader understanding of Angular before I had begun. I didn’t need to know exactly how the Http service worked, just that there was one, and therefore, would have known where to turn to make that API call.

To sum it all up, the passive phase is great for exposing yourself to the breadth of a topic (concepts, ideas, etc), whereas the active phase will really hammer home the knowledge and give you a deep understanding of what you are learning.

The trick is finding the sweet spot where these two intersect.

Thanks for reading, I hope you were able to take away something of value for your time. Please feel free to comment below either way.

-Jeremy

Learning to code? Avoid Workload Paralysis

There’s a lot to consider when learning to code.

A LOT!

In fact, saying “there’s a lot to consider” is a huge understatement. Chances are, at some point you are going to get overwhelmed with trying to find the best path forward.

With that overwhelmed feeling comes the sense of workload paralysis. You know, that feeling where you have way too much on your plate and you can’t possibly picture a way to get everything done.  So you just sit there, shut down and stare at your monitor like a deer in headlights…

Sound familiar??

The Triggers

This has happened to me several times while on this ‘Learn to Code’ journey and in looking back, I’ve identified two main triggers for it…

Either a) I’ve read the opinions of too many people, each giving different advice on how to approach learning to code or b) I’ve let my mind to wander from the task at hand and allowed the big picture overwhelm me.

Granted, these are what I’ve identified as my triggers. Yours could be different, so it might be worth a little time reflecting on the situations that send you into paralysis.

For the time being, let’s dig a little deeper into mine…

The Trap of Too Much Advice

Reading advice is a good thing, it can help you navigate your journey more efficiently. But taking advice from too many people, all with opposing views can be paralyzing.

Or worse, you’ll start resembling this cat trying to catch a laser pointer.

via GIPHY

That could get ugly pretty quick… But what to do about it?

Make it your mission to find someone whom you trust, and who is offering advice on the exact goals you have set out for yourself. Doing this will keep you focused on your own path, not someone else’s…

Use this advice to draw a path forward and trust that if you maintain that path, you’ll eventually reach your goals.

Most importantly, write the plan down.  I’ll discuss this more below, but if you try to keep this all in your head you’re destined to become that cat…

The Big Picture

Don’t get me wrong, I’m not saying that you shouldn’t have perspective of the big picture.  But if you allow it to overwhelm you, you’ll lose sight of the path you’ve have carved out for yourself.

As I mentioned above, use the advice of someone you trust to create a plan.  A key part of this, is writing it down and approaching it in a step by step manner.

All you really need for this is a pen and a piece of paper, but if you prefer to keep a digital copy, Trello or even Google Docs are decent options (yes, I know there are plenty of storyboard and goal writing apps out there, but that’s beyond the scope of this article).

Once you write everything down, you no longer have to spend the mental bandwidth on remembering the entire plan.  You can clear your head and focus on the next step.

Again, allow yourself to look at the big picture but ALWAYS keep your focus on the next small task in order to maintain momentum on your path forward.

As alway, I hope this was helpful, feel free to leave comments below.

Now go build something awesome!!

-Jeremy